
Please check my writing task 1. How to build your own water clock
The diagram below shows the process for making a water clock.
Summarize the information by selecting and reporting the main features, and make comparisons where relevant.
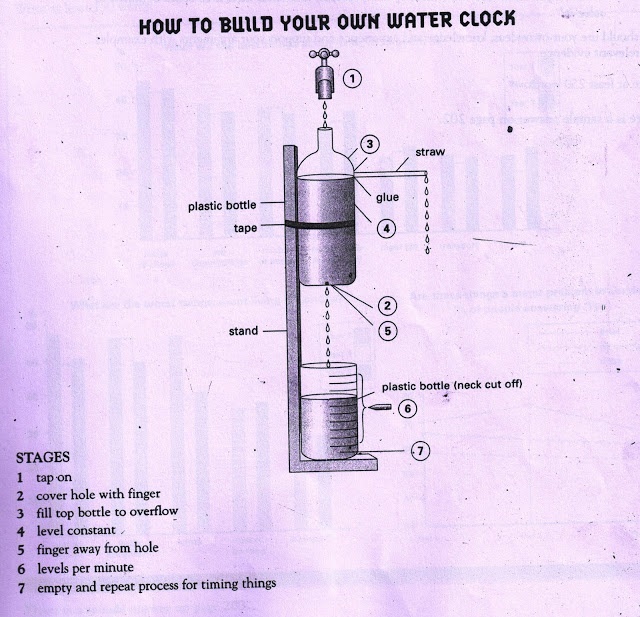
The diagram describes how to recreate a water timer. In general, the process includes many steps, beginning with the flow of water from the tap and ending at the plastic bottle.
To begin with, a set of compartments is required to build the water clock. First of all, a L-shaped stand is put under the tap with its top attached to a plain plastic bottle whose bottom has a hole by tape. In addition, a straw is glued into one side of that bottle. At the bottom of the stand, there is a stratified bottle with its neck cut off.
Once the tool is ready, turn on the tap and put a finger beneath the plain bottle to allow the water to fill in. The excess amount of water will leave through the straw in order to keep the water level unchanged. After that stage, release the finger to let water flow into the second bottle which displays levels per minute. Finally, eliminate the content and repeat another process.
Top answer
The diagram describes how to recreate a water timer . (wrong words) In general, the process includes many steps, beginning with the flow of water from the tap and ending at the plastic bottle . (That is not a step.
- The diagram describes how to recreate a water timer .
- (wrong words) In general, the process includes many steps, beginning with the flow of water from the tap and ending at the plastic bottle .
- (That is not a step.
- ) To begin with, a set of compartments (wrong word) is required to build a the water clock.
- First of all, a an L-shaped stand is put under a the tap .
Get the Weekly English Kit 📬
New words, one handy idiom, and a 2-minute quiz — delivered to your inbox to keep your streak alive.
The diagram describes how to recreate a water timer. (wrong words) In general, the process includes many steps, beginning with the flow of water from the tap and ending at the plastic bottle. (That is not a step. A step is an action, for example
 Related Questions